Wednesday, January 11, 2012

Heart Shaped Crayon Valentines!

Time for some fun Valentine projects!  Let's take a look at some cute valentine card ideas.  Of course, you can do as simple or as complex as you would like but as we all know kids love to get some sort of treat with their Valentine card.  Today I will show you how to make crayon hearts!

These are so fun and really easy to make.  Gather your misc. crayons and strip all of the paper off of them. If you need to purchase crayons, your local Dollar Store is your best option.  Many tutorials will tell you to cut them into small pieces but this is very time consuming!  Instead, put them in a plastic baggie and break them up with a meat tenderizer.  Be careful not to totally crush them.  You will get more color variation if the crayons are chunky.  After they are broken into small pieces, place the crayons into a heart shapes pan or silicone mold.  After you have filled your molds, place them into the oven on low heat.  Bake at 250 for 15 minutes or just long enough to melt the crayons.

armcandyconfessions.com

(Individual silicone molds)
Megasimple.blogspot.com
Once the crayons have turned into a "liquid rainbow" remove them and let the wax cool until hardened.  If your wax looks cloudy, no worries, in a couple hours it will be clear and pretty!


Adhere the heart shaped crayons onto a paper Valentine!  It is best to use card stock for your card to hold the weight of the crayon. Take a look at these finished products! 

This one is from arm candy confessions 
From small little pieces of crayon to a super cute homemade valentine!


thelongthread.com

Sunday, January 8, 2012

Valentine's Day Decor!


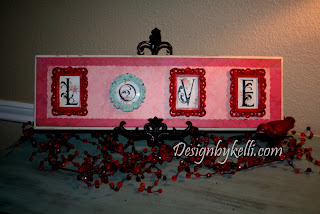
This one was so fun and super easy!  As I often do, I was on the hunt for another holiday project.  While in Michael's I found these adorable little baroque frames.  I immediately thought that it would be cute to add them to a wood board and make a cute Valentine's plaque.  The cost of this plaque is under $15 and is a great project to do with the kids!

Here is the tutorial~
Materials-
Wood plaque or board
Off white acrylic paint
Sand Paper
4 small decorative mirrors- ($1.50 @ Michael's)
Scrapbook paper- 3 different designs
Decorative scissors
Hot glue
Medium tack spray adhesive
"LOVE" Vinyl lettering.  Only $3.75!

First you need to get yourself a wood plaque.  I cut and prep these myself.  It is not as hard as you think.  Go down to your local hardware store and purchase a pine board that is about 8" wide.  They usually come in lengths of 6', 8', 10', and such.  If you go to Home Depot they will cut it for you!  Just tell them the length you want and they will cut the board down to create several boards for all of your craft projects!  For this project I used a board that was cut down to 24" long by about 8" Wide.
Be sure to sand the edges and surface of your wood to ensure a smooth finish.  If you have the skills and the tools you can even use a router to give your plaque and decorative edge.

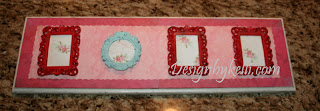
Next, paint the outer edges and a border around the surface of your board.  No need to paint the entire surface because your paper will cover most of it.  As you see below, only about 1/4" of the wood is exposed after the scrapbook paper is applied.


Next, cut your paper to fit your board.  Keep in mind that if you use a board that is longer than 12" you will need to use 2 pieces of paper to cover the length of your board.  My paper measures 6"x 10" each.  This leaves a 1" border around the surface paper.  If you choose a paper with a print, be sure to match up the design at the seam so that the seam is somewhat disguised.  When you apply the frames they will cover a lot of the board so no need to worry about the seems being very noticeable.

Continue to cut a 1" border for the outer edge of your board using scalloped craft scissors to create a cute scalloped border.  Leave one edge straight. It can be tricky to keep your cuts level when using scrapbook scissors.  It makes it much easier to match up your borders if you use your original cut as a template by lightly tracing your original strip onto your paper.  Your will end up with 6 strips- 2 for the side and 4 for the top and bottom.  (See photo below).

Image Valentine craft vinyl decal

Once you have cut all of your paper, do a test run to make sure all of your paper fits the surface the way you want it to.  You will overlap your trim pieces (red) onto your surface paper (pink) so that you cannot see the edge of the pink paper.  Once you are satisfied with the look, use your spray adhesive to adhere your paper to the board.  The adhesive is a great alternative to using Modge Podge and is MUCH less messy!  Just be sure to spray it outside or in a protected area because the over spray of the adhesive will stick to your surfaces and is VERY difficult to clean up.

This is what is should look like-

Image Valentine craft vinyl decal

Now it is time to prepare the frames.  I chose 3 rectangle and one round frame.  Michael's has red, black, blue and cream frames.  I chose red and blue but lightened the blue by painting it. 
Turn the frames over and remove the stand and backing clips. You do not want these on the frames because they are bulky and prevent the frames from lying flat on the board.  No worries about them staying closed because it will be glued shut when you glue it to the board.
Remove the paper inside the frame and replace it with coordinating scrapbook paper.  It makes it easier if you use the original template from the frame to trace your new paper.

Image Valentine craft vinyl decal

Next glue your frames on your board spacing them evenly.  I find it easier to place the first frame and then the last before placing the 2 in the center.  This will ensure better spacing.

Last, place your vinyl letters on the front of the frames and you are done!  (You can order the lettering from me for only $3.75.  Just shoot me an email! designbykelli@gmail.com)

HOW CUTE IS THIS?!

Image Valentine craft vinyl decal

Thursday, January 5, 2012

Clean it out! Get organized in 2012!

We all do it!  Hold on to things that we think we need, but don't really have a place for! Eventually we find ourselves surrounded by these things that start to clutter our homes and eventually our lives. 
If you are feeling overwhelmed or stressed out take a look at what is around you?  What is your living environment like?  Is it tidy, organized and manageable?  If not, this could be a huge part what is causing underlined stress in your life.  Many times people are so overwhelmed with their lack of organization that they don't do it at all.  DON'T let it overwhelm you!  You just need to follow a few simple steps to get started and be successful.

Step 1-  If so why?  Pin point how your current state of organization has affected your life.  Understanding the why is an important part of achieving long term success because it helps you recognize the consequences that being unorganized has caused in your life.  You will find that the lack of organization costs you time, money and sometimes can be a health risk.

Step 2- Write it down.  What is your overall goal?  If it is to clean your entire house, write that down but don't let it overwhelm you. Every goal will be broken down several times to make it doable.

Step 3- Make a plan. Be realistic. Don't expect everything to change overnight.  It took awhile to create the clutter, it will take some time to organize it.  Where do you want to start?  Choose a room that has the least amount of work.  This will help you see quicker results and keep you motivated.  Each room is a project in itself.   Take each project and write down what you want to happen in that room.  If you start in a bathroom, identify individual projects in the bathroom and set small goals for each individual project. 

For example:

Overall goal- CLEAN AND ORGANIZE THE HOUSE

BREAKDOWN- 
Bathroom-
       Organize-
       Vanity-
       Medicine Cabinet-

       Clean-
       Tub
       Tile
       Toilet
       Sink
       Floor

Do this in each room.  If you have a desire to redecorate, hold off until you have your overall goal completed.  You will find it is much easier and less daunting to do an entire overhaul on a room if the rest of your house is clean and organized.  It will also help you save money in the long run because you will be able to better prioritize your redecorating projects and possibly re-purpose items that you might have.  However, DO NOT HANG ONTO THINGS YOU DON'T NEED!
A general rule of thumb is if you haven't used it in 1 year, it should go!  So many times we are afraid to get rid of things because we think we might need it someday.  Get rid of it anyway.  The cost of being unorganized is much more than it will most likely cost you to replace an item you find you need down the road.  Better yet, if you find you use an item only once every few years, don't buy it, barrow it from a friend or family member or rent it if it is an item that can be rented.

As you go through each room, have 2 containers available to put your items in.  One labeled "KEEP" and one labeled "Throw out".  Be honest with yourself.  It does no good to talk yourself into keeping things you don't need.  You will just end up in the same situation you started with.  Quickly get rid of the items in the "Throw out" container so that you don't convince yourself to start pulling things out of it.  Once you have decided what you are keeping, organize them into categories.  For example, if you are organizing your bathroom vanity, purchase small baskets to put in the vanity.  Use different baskets for different items.  One basket for hair products, one for face products, one for curling irons, hair dryers etc.  Keep it simple.  Don't have 12 different baskets, just group like items together.   This will help you KEEP things organized because they will always have a home.  Be consistent. It only takes a couple seconds to place your items back in the correct place, but saves hours of time it would take to reorganize!

YOU CAN DO IT!  Just remember to break it all down and keep it realistic.  If you only have 20 minutes a day, just do 20 minutes.  Choose one drawer, one shelf, or one container to work on at a time.  It will create a sense of accomplishment rather than discouragement because you didn't organize the entire room.  It's OK for you to take a couple weeks to organize a single room.  It's your timeline.  Do however have a end date in sight.  Otherwise you may never cross the finish line.

You can do it!  Choose to change your life today!