


Thursday, September 20, 2012
Halloween Features!
Hi everyone! Starting tomorrow I will be featuring Halloween Decorating ideas! If you have any pictures of Halloween decor from years past or if you have already started decorating, send in your current photos! Let's get decorating!

Thursday, September 13, 2012
Halloween Decor Classes
It's that time of year again! Halloween is just around the corner and I will be hosting my annual holiday decor classes. This year we will be making an "All Hallows Eve" sign, a darling cupcake stand, a faux cupcake and you also get a black raven to go with the vignette! Shoot me an email if you want to sign up. The class will be held Friday, September 28th at 11am. The cost is only $22.00.
designbykelli@gmail.com. You can order the vinyl for the sign for $10.00 as well!


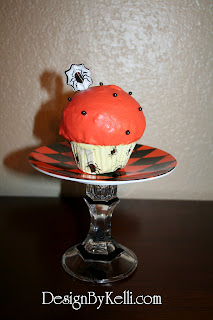

designbykelli@gmail.com. You can order the vinyl for the sign for $10.00 as well!


Wednesday, August 29, 2012
Let it begin {again}
Hi all! Summer is coming to a close and I am gearing up to get my vinyl and design on again! While I have been busy locally with weddings, vinyl and interior design, I try to scale back in the summer so that I can enjoy the time I have with my kids. :)
School starts next week so lots of fun stuff to come~
School starts next week so lots of fun stuff to come~
Monday, August 6, 2012
New vinyl guitar decals!
Introducing new guitar vinyl designs! Aren't these cool?! I love them and can't wait to start using them! Just image them on a wall, canvas or even your car!





Wednesday, July 18, 2012
NEW ADVENTURES!
I have spent several years hosting parties and events for myself and others. I have often said that I would love to do this as part of my business, (which I do on a small scale already, but don't advertise it.) After "TALKING" about it for years, I think I am ready to jump in with two feet! I absolutely LOVE putting on events and find it very rewarding to use my creativity to bring joy to others and create fun and unique spaces. After talking with a couple of my friends tonight, I think I am ready to go for it! My niche~ (thank you Margaret), "EVENT PLANNING FOR THE DIYer!"
What exactly does this mean? Well, if you have an event, a Birthday Party, Anniversary, or even a Wedding and you need help coming up with creative ideas and need someone to help you execute it, I'm your girl. I will help you come up with the overall plan, design and help the day of the event. On a budget? Even better! That just means more creativity!
I will, of course, continue to do interior design and vinyl designs this will just be another fun addition to my adventures!
Bring on the PARTIES!!!!!
Kelli :o)
What exactly does this mean? Well, if you have an event, a Birthday Party, Anniversary, or even a Wedding and you need help coming up with creative ideas and need someone to help you execute it, I'm your girl. I will help you come up with the overall plan, design and help the day of the event. On a budget? Even better! That just means more creativity!
I will, of course, continue to do interior design and vinyl designs this will just be another fun addition to my adventures!
Bring on the PARTIES!!!!!
Kelli :o)
Wednesday, June 6, 2012
Kitchen Re-Do! Painted cabinets and more~
And now for the kitchen! This is the before-

 |
| AFTER! |
 |
| Glaze highlights all of the detailing in the cabinets |


I added a simple valance on top of the Roman Shades, No sew! I used the fusing tape and an iron to make this. Super easy!


Lastly, I added some definitions to my glass canisters. I love the way they turned out. I must say however, I won't be selling these as the words are so small it is a nightmare to weed the negative parts of the vinyl out of the solid sheet! If you just want the labels, ie. SUGAR, FLOUR etc. No problem! I can do that. It' the little itty bitty words that were not fun!


This is always time consuming but well worth the effort! It is actually a simple process.
Here are some simple step by step instructions~
Quick glance guide-
1- Remove doors and hinges
2-Label doors
3-Clean doors and bases with TSP
4-Sand
5-Prime
6-Paint
7-Glaze
8-Seal
9- Hang
Detailed Instructions-
1- Remove Each door and hinge ONE BY ONE.
2- Label each door so that you know where it goes.
(I know you may think that this is a silly step and your thinking- "Of course I will know where they will go"- TRUST ME....label them. It is much easier! I wrote inside the hole where the hinge fits because it provided enough room to write without it being covered with paint. Another option is to use painters tape on the back side if you are not planning on painting the inside of the cupboard doors.) I labeled them "U" for upper and then a #. For example U1, U2 etc. L for lower-
3. Use "TSP" to clean the fronts of your doors and cabinet bases. This is an important step. It will get all of the hidden grease and grime off of your cabinets. It's there even if you don't see it! You can get this at your local hardware store.
4. Lightly sand or use a deglosser/liquid sander solution. This will give the primer a better surface to stick to. DON"T SKIP THIS STEP! This is key to a good, long lasting finish. I would recommend sanding over the liquid because it is a fail proof method.
5. Next prime. I prefer "Gripper" brand primer as it is amazingly durable. You can find it at Home Depot. I cut into the grooves with a paint brush and then immediately roll over it with a smooth sponge roller. This will prevent brush strokes and give a nice smooth finish.
6. Time to paint! Apply at least 2 coats of your paint in the same way you applied your primer. Use a brush and then roll over it with a sponge roller. BTW- The paint people (at Home Depot) tried to tell me years ago when I started doing this not to use the sponge roller because it soaks up to much paint. Don't listen to them. :) This is the only way to get the pro finish you want. It doesn't soak up that much paint.
7. Lastly, if you want to glaze your cabinet doors, mix one part paint, (espresso) to 2 parts glaze. Brush the glaze over the doors where there are grooves. I brushed mine over the beveled part of my doors.
Next, with a lint free cloth, rub away the glaze so that it leaves behind a rich dark color in the grooves of the door. If you are picky like me, you can methodically pull your rag down one side of the groove and then the other to be sure the glaze leaves a nice straight (ish) line.
I ran a line of color around the edges of the doors as well even though there was no groove. I just liked the look of it. Again, I pulled the rag down both sides of the line to get an even line. (If this seems confusing I basically wiped away the paint on each side of the line so that all that was left was a thin line.) You don't want it to be perfect because it is suppose to look a bit aged. :)
8. Last, (because I go a little over the top) I applied a coat of glaze over the entire door to seal everything and protect the paint! This makes it easier to clean and since your kitchen gets a lot of wear and tear, it is best to seal everything.
9. Once the cabinet bases and door are dry...(BE PATIENT,) you get to hang them and admire all of your hard work!
Tuesday, June 5, 2012
Hand painted furniture tutorial!
I have been having way to much fun re-doing my kitchen and some furniture the last couple weeks! I thought I would show the results! First the cabinet-
I found the cabinet at an estate sale a couple weeks ago hiding in that back of someone's garage. Of course it caught my eye and I convinced my hubby that I HAD to have it! :)
I brought it home and got to work! After sanding, priming with "GRIPPER" primer and painting it, I distressed it with paint using an antiquing technique with paint! I then rubbed it down with some burn sienna paint tint to give it an aged look. I love how it turned out! I will post the pics of the kitchen tomorrow! :)


I found the cabinet at an estate sale a couple weeks ago hiding in that back of someone's garage. Of course it caught my eye and I convinced my hubby that I HAD to have it! :)
I brought it home and got to work! After sanding, priming with "GRIPPER" primer and painting it, I distressed it with paint using an antiquing technique with paint! I then rubbed it down with some burn sienna paint tint to give it an aged look. I love how it turned out! I will post the pics of the kitchen tomorrow! :)


Subscribe to:
Posts (Atom)