Showing posts with label Storage. Show all posts

Friday, April 5, 2013

DIY Farmhouse bed!

I thought I would share with you one of the projects that I built recently!  This wonderful king size farmhouse bed!  What do you think?  It really wasn't too bad.  I got my plans from Ana White.  She has made it REALLY easy to build her DIY furniture!  She supplies the shopping list, cut list and instructions. I modified the plan when I found another version on her site from someone else who built the same bed.  Here is her link-

I wanted cubbies for storage and also wanted to access the space under the bed between the cubbies. So here is what I did~

I first build 2 sets of cubbies.  Each one is 16" deep x 15" Tall x 80" Long.
I added 1" trim to the front of the cubby to finish the edges which made the depth 17". I attached the bottom trim flush with the inside of the cubby so it raised the height to about 15 1/2".  (Visit the site and this will all make sense!)

Next I built the headboard and the foot board.  I attached the center board of the foot board to the posts with top hinges and a latch at the bottom so that I could open it to access the middle of the bed. 

Finally (After painting everything!) I screwed the headboard and foot board to the cubbies.  I used L brackets in some place to make it even more secure.  I didn't want the bed to move or squeak AT ALL!  :)

Be aware that when you follow Ana's plans she turned her king size bed on its side and so the dimensions are not exactly accurate for a typical king size bed.  READ all of the directions before you begin your project.

The overall cost was about $400 or so.  About 1/4 of what it would have cost me to buy one!  And...I know it is done right and with solid wood. 


Here are the cubbies!  I bought regular old Steralite storage bins from Target and slip covered them with canvas. I wanted BIG bins so this was my best option. 


I simply laid the tote on top of the fabric (one side at a time) and cut each piece about 2 inches bigger than that actual size to allow for the seam.  The exception was at the top.  I wanted the fabric to fold over the top so I added about 5" to the height and used the finished edge of the fabric.


As you can see there is a lip around the top of the bin. Once I sewed the four sides together I pulled the slipcover over the bin (Inside out) and I folded the fabric at the corners and pinned it so that it would fit snug and not fall off of the bin.  I then stitched the mitered corners.  I had to be careful to not sew it too tight because I had to be able to pull it over the bin. Next, I simply adhered Velcro to the bin and the underside of the fabric to attach it. I glued the Velcro to the bin with E6000 glue and held it down with masking tape until it dried. I stitched the Velcro to the fabric.  It's not going anywhere!  I am super happy with the finished project!  I think I will be adding some sort of vintage print to the front of the slip covers at some point but that is another project for another day!


Tuesday, June 5, 2012

Hand painted furniture tutorial!

I have been having way to much fun re-doing my kitchen and some furniture the last couple weeks!  I thought I would show the results!  First the cabinet-

I found the cabinet at an estate sale a couple weeks ago hiding in that back of someone's garage.  Of course it caught my eye and I convinced my hubby that I HAD to have it!  :) 

I brought it home and got to work!  After sanding, priming with "GRIPPER" primer and painting it, I distressed it with paint using an antiquing technique with paint!  I then rubbed it down with some burn sienna paint tint to give it an aged look.  I love how it turned out!  I will post the pics of the kitchen tomorrow! :)


Sunday, February 26, 2012

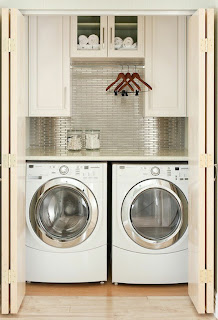
Small Laundry spaces!

Like many of you, my laundry area is in a wonderfully tiny hall closet!  I have the itch to do something with it.  Here are some wonderful design ideas where a small closet has been transformed into a beautiful inviting area.  I may even start enjoying doing my laundry!  (I will let you know when I actually put these ideas to work!)  I absolutely love the first one!  The doors in front of the washer and dryer are a perfect way to hide the appliances.

Better Homes and Gardens


Better Homes and Gardens

Better Homes and Gardens

Martha Stewart

Better Homes and Gardens

casadevalentina.com

Thursday, February 18, 2010

Contain the clutter!


We all have a corner where we have misc. stuff just sitting around. Contain it! It will make the area look intentional. Find a cute basket, or decorative container. I used an antique replica wire farm basket here. I added some decorative items to improve the overall look. If you have several items that you don't want to look at consider using a decorative box with a lid. Consider containing your books, toys or other various items you have sitting on shelves or dressers.

The cute pictures of the baskets that I have posted here are from Hulla Baloo home decor

Friday, July 17, 2009

Distressing painting technique


Do you have a piece of funiture that doesn't look quite the way you would like it to look? Update it or personalize it by painting it a fun color! Finsih it off with a nice drybrush technique that will give it some personality. Drybrushing is an easy painting tecnique that creates some depth and gives the peice of furniture an aged look without sanding. Sanding can sometimes damage the furniture so drybrushing is a better alternative.

How to drybrush-
After you sanded, primed and painted the base color on your furniture, choose a color such as burnt umber, black or any natural toned dark paint. When I say natural tone, I mean a color that would be an earthtone but it should be rather dark. To get an aged look on furniture you are more or less trying to make it look worn and somewhat "dirty". Therefore the colors must be in line with what the natural process would do.

After you have chosen your drybrush color, take a large brush, 4 inches or so and rough up the ends. The best way to do this is by pounding it into your driveway or any rough surface. Crazy I know! But it will give you the best result. You know it is "beat up" enough when you see fattening of the bristles at the end of the brush. Next grab a couple paper plates and we are ready to paint!

Dip the end of your brush into your paint. You only need a small amount of paint so it may be easier to put a small puddle of paint on a paper plate instead of dipping into the can. Next, wipe off most of the paint that is on your brush by swiping back and forth on a paper plate.

You are now ready to apply the paint to the furniture. Beginning at one end, drag your brush across the surface. Be careful to do it lightly. You can always add more. Concentrate on the edges of the furniture and the raised surfaces. Always go with the grain of the wood. Continue the process until the surface has the effect that you are trying to achieve. If you find that the drybrushing finish is heavier than you would like it to be, simply take your base coat color and drybrush with that color over the darker one. (Using a bit more paint.)

You now have a custom piece of furniture that you can enjoy for years to come!
If you have any projects that you have done, I would LOVE to see them and post them for others to see as well!